Home » Casio CELVIANO AP-450 Digital Piano User Guide
Getting Ready
Assembling the Stand
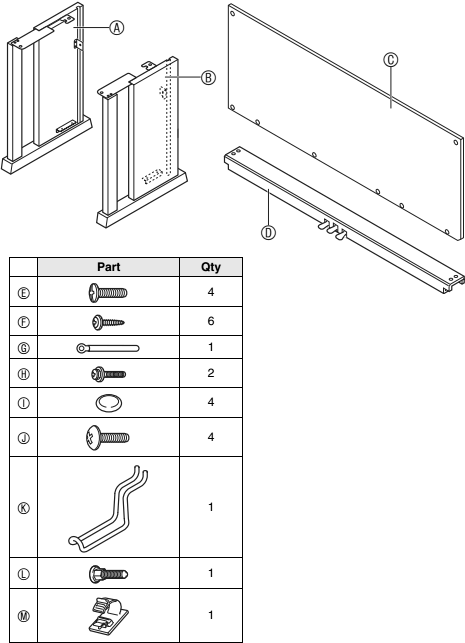
Before assembling the stand, first take a few moments to check that all of the items shown below are present.
• This stand does not include any of the tools required for assembly. It is up to you to prepare a large Philips head (+) screwdriver for assembly.
IMPORTANT!
• Do not use any screws other than those that come with the stand. Doing so risks damage to the stand and/or Digital Piano.
• You can find the screws in a plastic bag inside of the packing material.
• If anything is missing or damaged, contact your local CASIO service provider.
CAUTION
• Assembly of the stand should be performed by at least two people working together.
• This stand should be assembled on a flat surface.
• Do not remove the tape securing the keyboard cover in place until assembly is complete. Removing the tape can cause the keyboard cover to open and close during assembly, creating th e risk of personal injury to your hands and fingers.
• Take care that you do not pinch your fingers between parts when assembling them.
-
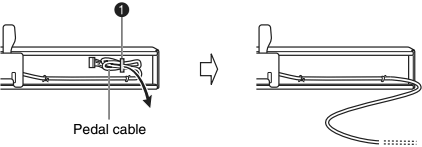
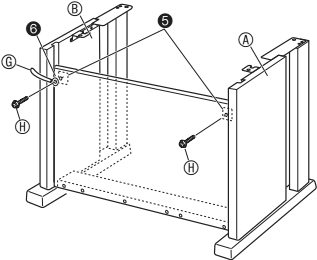
Unfasten the band (1) that bundles the pedal cable to the back of crosspiece (D) and pull the pedal cord out from the crosspiece.
-
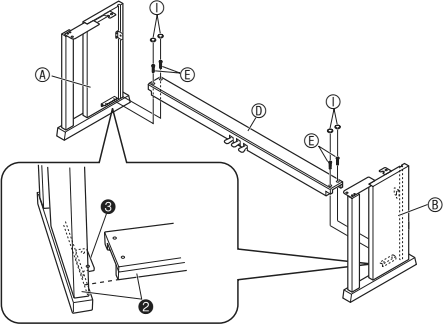
Attach side panels (A) and (B) to crosspiece (D). Secure the side panels using four screws (E).
• When installing parts (2) , slide the brackets (3) into the slots in either end of crosspiece (D). If the brackets (3) are not inserted into the ends of the crosspiece (D) as far as they will go, the screws (E) will not be able to enter into the screw holes of the brackets (3), which can strip the threads of the screws.
• Cover the screw heads with the caps (I).
-
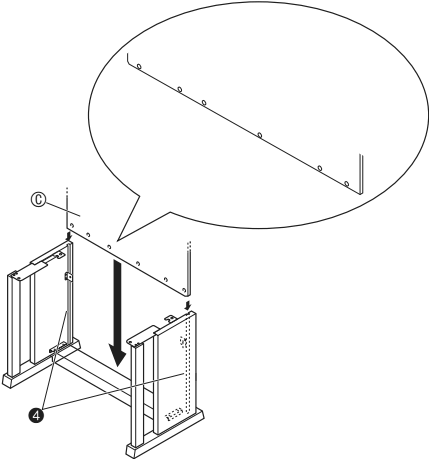
Slide back panel (C) into the grooves (4) of the side panels.
• Before sliding back panel (C) into place, make sure that the widely spaced screw holes along the bottom of the panel are on the left (when viewed from the front of the stand), and the narrowly spaced holes are on the right.
-
Use the two screws (H) to secure the top left and right edges of the back panel (C) to the brackets (5) of side panels (A) and (B).
• At location (6), slip the clip (G) onto to the screw (H) before installing the screw.
-
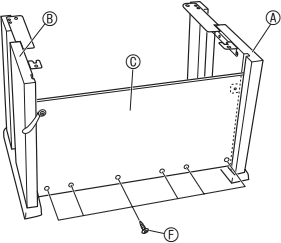
Next, secure the bottom of the back panel (C) with the six (F) screws.
-
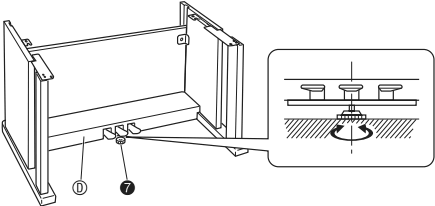
Adjust the height adjustment screw (7) to provide support so crosspiece (D) does not bow downwards when the pedals are pressed.
IMPORTANT!
• Pressing the pedals without adjusting height adjustment screw (7) can result in damage to crosspiece (D). Always make sure you adjust height adjustment screw (7) before operating the pedals. -
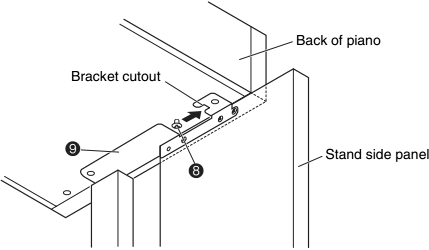
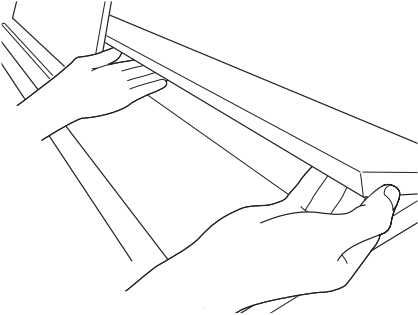
Place the piano onto the stand.
IMPORTANT!
• In order to ensure you do not get your fingers pinched between the piano and the stand, grasp the piano on its sides (not its ends) at the locations marked with stars ( ) in the illustration.
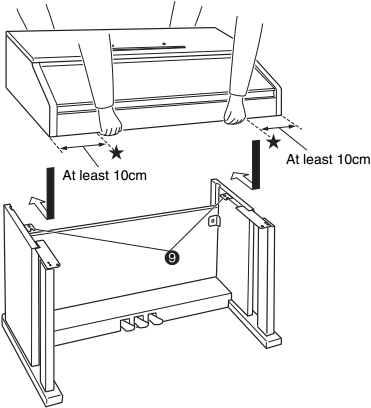
• At this time the screws on the bottom of the piano (8) should hook into the cutouts in the stand brackets (9).
-
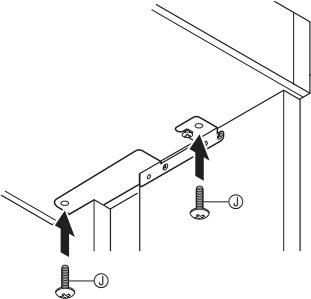
First, use the two screws (J) to secure the back of the piano to the stand. Next, use the two screws (J) to secure the front of the piano.
IMPORTANT!
• The screws (J) keep the piano from slipping off the stand. Never use the piano without the screws (J) installed. -
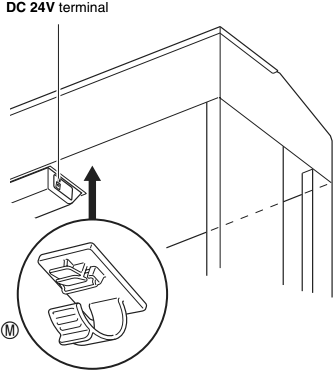
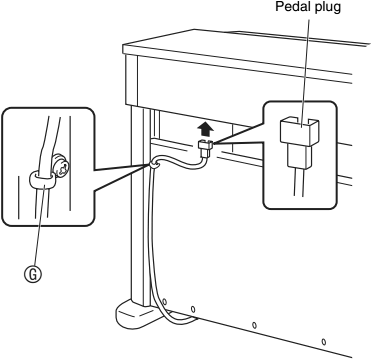
Affix the adaptor cord clip (M) next to the power terminal (DC 24V).
To connect the cables
-
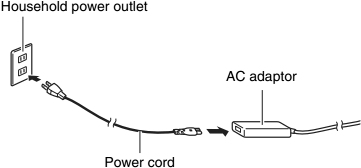
Insert the plug of the AC adaptor that comes with the Digital Piano into its power terminal (DC 24V).
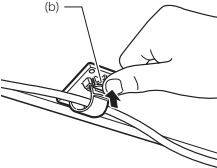
* Using the Clip (M)
• To fasten the clip
As shown in the illustration, press down on (a) to force the tip of the clip into th e slot. Press down until you hear the clip click securely into place.
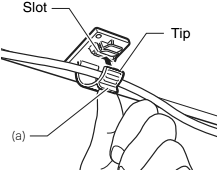
• To release the clip
As shown in the illustration, press (b) in the direction indicated by the arrow.
-
Orienting the pedal plug as shown in the illustration, plug it into the pedal connector on the bottom of the piano.
• Secure the pedal cord with the clip (G).
-
Plug the power cord of the AC adaptor that comes with the Digital Piano into a household power outlet as shown in the illustration below.
To install the music stand and headphones hook
-
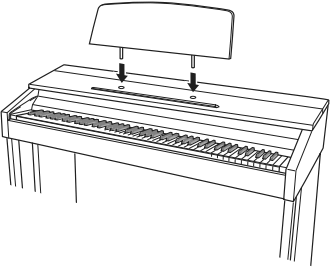
Install the music stand by inserting its pegs into the holes in the top of the piano.
-
Install the headphones hook.
2-1. Insert the headphones hook (K) into the two holes on the bottom of the piano.
2-2. Use screw (L) to secure the headphones hook in place.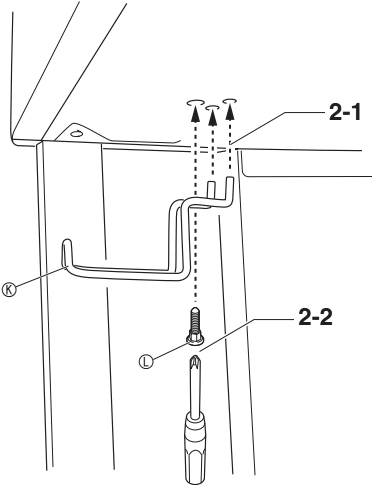
Opening and Closing the Piano Lid
IMPORTANT!
• Use both hands whenever opening or closing the lid, and take care that you do not close it on your fingers.
• Do not open the lid too wide. Doing so creates the risk of damage to the cover and digital piano.
• Stand in front of the digital piano on the right side when opening or closing the lid.
To open the lid
- Lift up the lid as shown in the illustration.
• The lid has a support bracket (indicated by the star in the illustration) attached to its inside surface. Check to make sure that the support bracket is standing up fully.
To close the lid
-
Carefully lift up slightly on the lid.
-
Use the fingers of your left hand to press back on the support bracket (
) as you slowly and carefully lower the lid.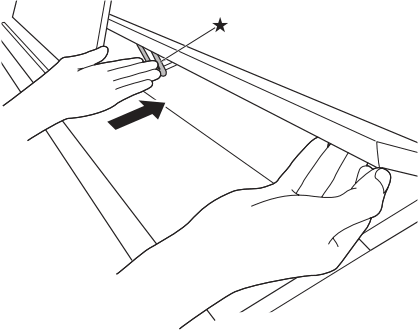
• The support bracket is designed to prevent sudden closing of the lid. Should the support bracket stop moving, once again press back on it (
) as you slowly and carefully lower the lid.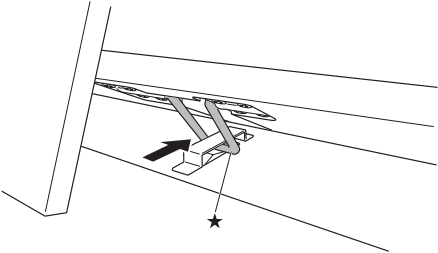
Power Outlet
Your digital piano runs on standard household power. Be sure to turn off power whenever you are not using the digital piano.
Using an AC Adaptor
Use only the AC adaptor (JEITA Standard, with unified polarity plug) that comes with this digital piano. Use of a different type of AC adaptor can cause malfunction of the digital piano.
Specified AC Adaptor: AD-E24250LW
• Use the supplied power cord to connect the AC adaptor.
About the AC adaptor that comes with the Digital Piano
Note the following important precautions to avoid damage to the AC adaptor and power cord.
• Never pull on the cord with excessive force.
• Never repeatedly pull on the cord.
• Never twist the cord at the base of the plug or connector.
• Before moving the digital piano, be sure to unplug the AC adaptor from the power outlet.
• Loop and bundle the power cord, but never wind it around the AC adaptor.
IMPORTANT!
• Never connect the AC adaptor that comes with this digital piano to any other device besides this piano. Doing so creates the risk of malfunction.
• Make sure the digital piano is turned off before plugging in or unplugging the AC adaptor.
• The AC adaptor will become warm to the touch after very long use. This is normal and does not indicate malfunction.
• Use the AC adaptor so its label surface is pointed downwards. The AC adaptor becomes prone to emitting electromagnetic waves when the label surface is facing upwards.
Connecting Headphones
Front
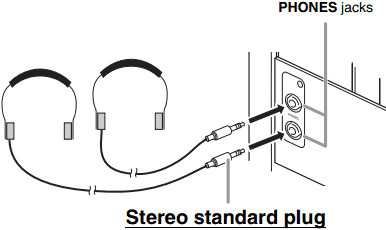
Connect commercially availa ble headphones to the PHONES jacks. Connecting headphones to either of the PHONES jack cuts off outp ut to the speakers, which means you can practice even late at night without bothering others. To protect your hearing, make sure that you do not set the volume level too high when using headphones.
NOTE
• Be sure to push the headphones plug into the PHONES jacks as far as it will go. If you don’t, you may hear sound from only one side of the headphones.
• If the plug of the headphones you are using does not match the PHONES jacks, use the applicable commercially available adaptor plug.
• If you are using headphones that require an adaptor plug, make sure you do not leave the adaptor plugged in when you unplug the headphones. If you do, nothing will sound from the speakers when you play.
Connecting Audio Equipment or an Amplifier
You can connect audio equipm ent or a music amplifier to the Digital Piano and then play through external speakers for more powerful volume and better sound quality.
IMPORTANT!
• The Digital Piano automatically adjusts sound output to optimize for headphone output (when headphones are connected) or built-in speaker output (when headphones are not connected). This also will cause a change in the output quality from the Digital Piano’s LINE OUT R and L/MONO jacks.
• Whenever connecting a device to the Digital Piano, first use the VOLUME controller to set the volume to a low level. After connecting, you can adjust the volume to the level you want.
• Whenever you connect any device to the Digital Piano, be sure to read the user documentation that comes with the device.
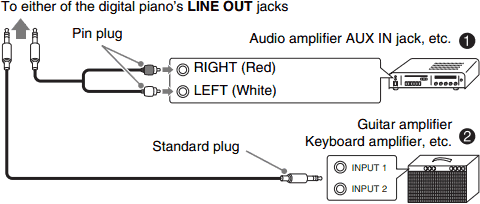
Connecting to Audio Equipment (1)
Use commercially available cables to connect the external audio equipment to the piano’s LINE OUT jacks as shown in Figure (1). LINE OUT R jack output is right channel sound, while LINE OUT L/MONO jack output is left channel sound. It is up to you to purchase connecting cables like the ones shown in the illustration for connection of audio equipment.
Normally in this configuration you must set the audio equipment’s input selector to the setting that specifies the terminal (such as AUX IN) to which the piano is connected. Use the piano’s VOLUME controller to adjust the volume level.
Connecting to a Musical Instrument Amplifier (2)
Use commercially available cables to connect the amplifier to the piano’s LINE OUT jacks as shown in Figure (2). LINE OUT R jack output is right channel sound, while LINE OUT L/MONO jack output is left channel sound. Connecting to the LINE OUT L/MONO jack only outputs a mixture of both channels.
It is up to you to purchase connecting cable like the one shown in the illustration for connection of the amplifier. Use the piano’s VOLUME controller to adjust the volume level.
IMPORTANT!
• When using the LINE OUT jacks, also connect headphones to the PHONES jacks. This will switch the LINE OUT output to appropriate sound quality.
Bundled and Optional Accessories
Use only accessories that are specified for use with this Digital Piano.
Use of unauthorized accessorie s creates the risk of fire, electric shock, and personal injury.
NOTE
• You can get information about accessories that are sold separately for this product from the CASIO catalog available from your retailer, and from the CASIO website at the following URL.
http://world.casio.com/