Home » Casio CELVIANO AP-450 Digital Piano User Guide
Recording and Playback
You can use the Song Recorder to record what you play on the digital piano to built-in song memory. When a commercially available USB flash drive is inserted in the digital piano’s USB flash drive port, audio data is recorded to and played back from the USB flash drive (Audio Recorder).
Recording to Built-in Song Memory (Song Recorder)
Tracks
A track is a container of recorded data, and a song consists of two tracks: Track 1 and Track 2. You can record each track separately and then combine them so they play back together as a single song.
Memory Capacity
- You can record approximately 5,000 notes in digital piano memory.
- The SONG RECORDER button lamp will flash at high speed when memory runs low.
- Recording stops automatically if the number of notes in memory exceeds the maximum.
Recorded Data
- Keyboard play
- Tone used
- Pedal operations
- Reverb and chorus settings (Track 1 only)
- Tempo setting (Track 1 only)
- Layer setting (Track 1 only)
- Split setting (Track 1 only)
- Octave shift setting (Track 1 only)
Recording Data Storage
- Starting a new recording deletes any data that was previously recorded in memory.
- Should power fail during recording, all of the data in the track you are recording will be deleted.
IMPORTANT!
CASIO COMPUTER CO., LTD. takes no responsibility for any damages, lost profits, or claims by third parties arising from the deletion of recorded data due to malfunction, repair, or for any other reason.
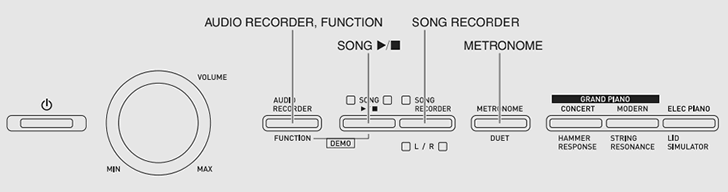
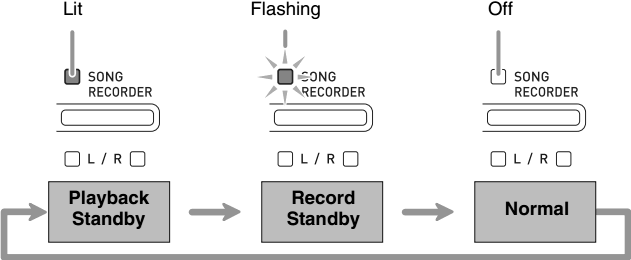
Using the SONG RECORDER Button
Each press of the SONG RECORDER button cycles through the recording options in the sequence shown below.
Recording to a Specific Song Track
After recording to either of the tracks of a song, you can record to the other track while listening to playback what you recorded in the first track.
-
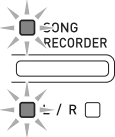
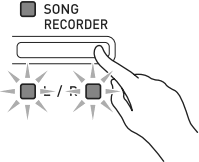
Press the SONG RECORDER button twice so its lamp is flashing.
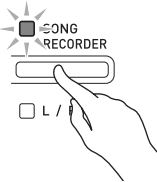
• At this time the L lamp will flash to indicate that the digital piano is standing by for recording to Track 1.
-
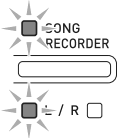
While holding down the FUNCTION button, press the SONG RECORDER (L/R) button to select the track you want to record.
• Make sure that the indicator lamp for the record track is flashing.
Track 1: L lamp
Track 2: R lamp
Example: Track 1 selected
-
Select the tone and effects (Track 1 only) you want to use in your recording.
• Tone (page E-5)
• Effects (page E-8)NOTE
• If you want the metronome to sound while you are recording, configure the beat and tempo settings, and then press the METRONOME button. See “Using the Metronome” on page E-9 for more information. -
Start playing something on the keyboard.
• Recording will start automatically. -
To stop recording, press the SONG
 button.
• This will cause the SONG RECORDER button lamp and the lamp of the track you recorded to change from flashing to lit.
• To play back the track you just recorded, press the SONG button. -
After you are finished recording or playing back, press the SONG RECORDER button so its lamp goes out.
Recording to One Track while Listening to Playback of the Other Track
-
Press the SONG RECORDER button so its lamp is lit.

-
While holding down the FUNCTION button, press the SONG RECORDER (L/R) button to select the track you want to play back while recording.
-
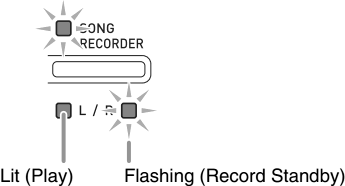
Press the SONG RECORDER button so its lamp is flashing.
• This will cause the L lamp to flash. -
While holding down the FUNCTION button, press the SONG RECORDER (L/R) button to select the track you want to record.
• Make sure that the indicator lamp for the record track is flashing.
Example: To listen to playback of Track 1 as you record to Track 2
-
Select the tone and effects (Track 1 only) you want to use for your recording.
-
Press the SONG
button or play something on the keyboard.
• This will start b oth playback of the recorded track and recording to the other track. -
To stop recording, press the SONG
button.
Playing Back from Di gital Piano Memory
-
Press the SONG RECORDER button so its lamp is lit.
NOTE
• When a song has something recorded in both tracks, you can turn off one track and play back just the other track, if you want. -
Press the SONG
button.
• This starts playback of the song and/or track you selected.NOTE
• You can change the tempo setting as a track is playing.
• Press the SONG button again to stop playback.
Deleting Recorded Data
The following procedure deletes a specific track of a song.
IMPORTANT!
• The procedure below deletes all of the data of the selected track. Note that the delete operation cannot be undone. Check to make sure you really do not need the data in digital piano memory before you perform the following steps.
-
Press the SONG RECORDER button twice so its lamp is flashing.

-
While holding down the FUNCTION button, press the SONG RECORDER (L/R) button to select the track you want to delete.
-
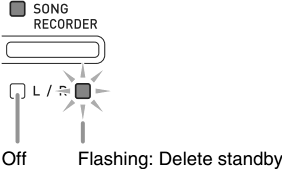
Press the SONG RECORDER button until its lamp is lit.
• This will cause the lamp of the track you selected in step 2 of this procedure to flash.
Example: If you selected Track 2 for deletion
-
Once again, hold down the FUNCTION button as you press the SONG RECORDER button.
• This deletes the selected track and enters playback standby.
• To cancel the delete operation at any time, press the SONG RECORDER button twice so its lamp is unlit.
NOTE
• Only the Digital Piano’s SONG RECORDER (L/R) button are operational from step 3 until you actually perform the delete operation in step 4. No other button operation can be performed.
Recording to a USB Flash Drive (Audio Recorder)
Anything played on the digital piano is recorded to the USB flash drive as audio data (WAV files*). If you play along on the digital piano as you play back data stored in song memory, the memory playback and your keyboard play are both recorded to USB flash drive.
* Linear PCM, 16bit, 44.1 kHz, Stereo
Recording Capacity
- 99 files (No. 01 to No. 99)
- Approximately 25 minutes maximum recording per file.
Recorded Data
- Anything played on the digital piano is recorded.
- Individual part recording is not supported.
Recording Data Storage
Each new recording of audio data to a USB flash drive is automatically assigned a new file name, so existing data is not overwritten.
Recording Digita l Piano Play (Audio Recorder)
PREPARATION
• Be sure to format the USB flash drive on the digital piano before using it. See “USB Flash Drive” on page E-26 for more information.
-
Insert the USB flash drive into the digital piano’s USB flash drive port.
• When you plug in a USB flash drive, the Digital Piano initially needs to “mount” the USB flash drive and prepare for data exchange. Note that Digital Piano operations are momentarily disabled while a USB flash drive mounting sequence is being performed. The Digital Piano’s L/R lamps flash while the mounting process is in progress. It may take up to 10 or 20 seconds or even long er for a USB flash drive to be mounted. Do not attempt to perform any operation on the Digital Piano while a mounting sequence is in progress (while L/R lamps are flashing). A USB flash dr ive needs to be mounted each time it is connected to the Digital Piano. -
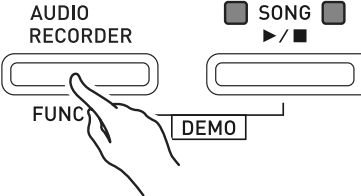
Press the AUDIO RECORDER button. Note that you should press the button and immediately release it. Do not hold it down.
• This causes the two SONG button indicator lamps to light.
-
Press the SONG RECORDER button so its lamp is lit.
-
Start playing something on the keyboard.
• The SONG RECORDER button lamp will flash once or twice to indicate that recording to the USB flash drive has started.NOTE
• Do not remove the USB flash drive from the USB flash drive port while the two SONG lamps are flashing or lit. Doing so will interrupt recording and may corrupt data. -
To stop recording, press the AUDIO RECORDER button.
• The two SONG button lamps will flash together three or four times to let you know that audio recording is complete. If you want to continue recording, perform the operations from step 4 under “Recording Digital Piano Play (Audio Recorder)” (page E-18). If you want to play back what you recorded, perform the operat ions from step 3 under “Playing Back Data Recorded on a USB Flash Drive” (page E-19). To exit the audio record/playback operation, press the AUDIO RECORDER button.
Recording Digital Piano Play as Data Recorded in Song Memory Plays Back (Audio Recorder)
-
Press the AUDIO RECORDER button. Note that you should press the button and immediately release it. Do not hold it down.
• This causes the two SONG a button indicator lamps to light.
-
Press the SONG RECORDER button so its lamp is lit.
-
Press the SONG
button.

• This will start playback of the current song memory contents. Play along on the digital piano. -
To stop recording, press the AUDIO RECORDER button.
• The two SONG button lamps will flash together three or four times to let you know that audio recording is complete. If you want to continue recording, perform the operations from step 4 under “Recording Digital Piano Play (Audio Recorder)” (page E-18). If you want to play back what you recorded, perform the operat ions from step 3 under “Playing Back Data Record ed on a USB Flash Drive” (page E-19). To exit the audio record/playback operation, press the AUDIO RECORDER button.
Playing Back Data Recorded on a USB Flash Drive
-
Press the AUDIO RECORDER button. Note that you should press the button and immediately release it. Do not hold it down.
This causes the two SONG button indicator lamps to light.
-
Press the SONG RECORDER button so its lamp is lit.
-
While holding down the AUDIO RECORDER button, press the SONG
button.
This starts playback of the last song you recorded.To select a file and play it
Hold down the FUNCTION button as you use the SONG SELECT keyboard keys to select the song you want.
• Press the minus (–) keyboard key to scroll back through songs in reverse chronological order.
• Press the plus (+) keyboard key to scroll forward.
• You also can use the number keyboard keys (0 through 9) to inputting a two-digit file number (01 to 99) and directly select a file (TAKE01.WAV, TAKE02.WAV, etc.). The keyboard will beep if there is no file on the USB flas h drive that corresponds to the number you input. -
To stop playback of the song, press the SONG
button.
Deleting an Audio File from a USB Flash Drive
Files can be deleted one at a time.
IMPORTANT!
• The procedure below deletes all of the data of the selected track. Note that the delete operation cannot be undone. Check to make sure you really do not need the data in the USB flash drive before you perform the following steps.
-
Press the AUDIO RECORDER button. Note that you should press the button and immediately release it. Do not hold it down.
• This causes the two SONG a button indicator lamps to light. -
Press the SONG RECORDER button twice so its lamp is flashing.
-
If you want to delete the last file you recorded, jump directly to step 4.
To select a file and delete it
Hold down the FUNCTION button as you use the SONG SELECT keyboard keys to select the song you want.
• Press the minus (–) keyboard key to scroll back through songs in reverse chronological order.
• Press the plus (+) keyboard key to scroll forward.
• You also can use the number keyboard keys (0 through 9) to inputting a two-digit file number (01 to 99) and directly sele ct a file (TAKE01.WAV, TAKE02.WAV, etc.). The keyboard will beep if there is no file on the USB flash drive that corresponds to the number you input. -
Hold down the SONG RECORDER button until both the L and R lamps flash.
-
Once again, hold down the FUNCTION button as you press the SONG RECORDER button.
• The digital piano will enter the song recorder playback mode after file deletion is complete.
• To cancel the delete operation at any time, press the SONG RECORDER button twice so its lamp is unlit.
NOTE
• When you record a new file, it is always automatically assigned the next new file number in the sequence of files currently on the USB flash drive, even if a previous number is unused (because a file was deleted). For example, if a USB flash drive contains files numbered 01, 02, 04, 07, 08, the next file recorded to the USB flash drive will be assigned file number 09.