Home » Casio CELVIANO AP-450 Digital Piano User Guide
Connecting to a Computer
You can connect the digital piano to a computer and exchange MIDI data between them. You can send play data from the digital piano to commercially available music software running on your computer, or you can send MIDI data from your computer to the digital piano for playback.
Minimum Computer System Requirements
The following shows the minimum computer system requirements for sending and receiving MIDI data. Check to make sure that your computer complies with these requirements before connecting the Digital Piano to it.
-
Operating System
Windows® XP (SP2 or later)*1
Windows Vista® *2
Windows® 7*3
Mac OS® X (10.3.9, 10.4.11, 10.5.X, 10.6.X, 10.7.X) -
USB port
IMPORTANT!
• Never connect to a computer that does not conform to the above requirements. Doing so can cause problems with your computer.
Connecting the Digital Piano to Your Computer
IMPORTANT!
• Make sure you follow the steps of the procedure below exactly. Connecting incorrectly can make data send and receive impossible.
-
Turn off the Digital Piano and then start up your computer.
• Do not start up the music software on your computer yet! -
After starting up your computer, use a commercially available USB cable to connect it to the Digital Piano.
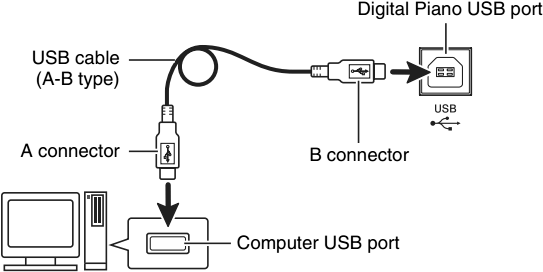
-
Turn on the Digital Piano.
• If this is the first time yo u are connecting the Digital Piano to your computer, the driver software required to send and receive data will be installed on your computer automatically. -
Start up commercially available music software on your computer.
-
Configure the music software settings to select one of the following as the MIDI device.
CASIO USB-MIDI: (For Windows Vista, Windows 7, Mac OS X)
USB Audio Device: (For Windows XP)
• For information about how to select the MIDI device, see the user documentation that comes with the music software you are using.
IMPORTANT!
• Be sure to turn on the Digital Piano first before starting up your comp uter’s music software.
NOTE
• Once you are able to connect successfully, there is no problem with leaving the USB cable connected when you turn off your computer and/or Digital Piano.
• For detailed specifications and connections that apply to MIDI data send and receive by this Digital Piano, see the latest support information provided by the website at the following URL.
http://world.casio.com/
Using MIDI
What is MIDI?
The letters MIDI stand for Musical Instrument Digital Interface, which is the name of a worldwide standard for digital signals and connectors that makes it possible to exchange musical data between musical instruments and computers (machines) produced by different manufacturers.
NOTE
• For detailed information about MIDI Implementation, visit the CASIO website at:
http://world.casio.com/.
See “Send channel” and “Local control” on page E-24.
Transferring Song Data with a Computer
Use the procedures in this section to transfer Recorder memory data to a computer for storage, and to load songs to user song memory (Music Library 61 to 70).
IMPORTANT!
• Turning off the Digital Piano while data is being saved or loaded can cause all data currently stored in Digital Piano memory (recorded songs, etc.) to be deleted. Take care so power is not turned off accidentally during data save and load operations. If data is deleted, it will take longer than normal for the Digital Piano to power up the next time you turn it on (page E-4).
-
Perform steps 1 through 3 of the procedure under “Connecting the Digital Piano to Your Computer” on page E-35.
-
Change the digital piano’s USB device mode to storage.
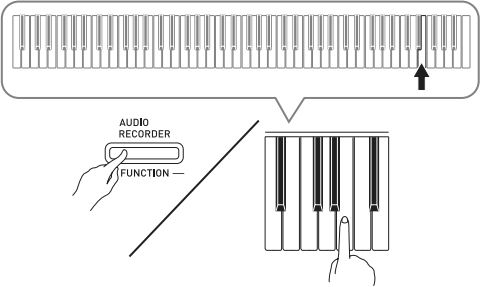
• While holding down the FUNCTION button, press the keyboard key that corresponds to the USB device mode.
• After this setting is changed, the GRAND PIANO (CONCERT, MODERN) and ELEC PIANO button lamps flash, and all other lamps are unlit.
• See “USB device mode” on page E-24 for more information. -
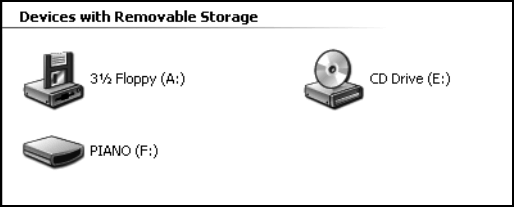
On your computer, perform the required operation to display your computer’s storage devices.
If your computer is running this operating system: Do this: Windows XP Double-click “My Computer”. Windows Vista, Windows 7 Double-click “Computer”. Mac OS Skip step 3 and double-click “PIANO” on your Mac desktop. •The memory of this digital piano will appear as “PIANO” under “Devices with Removable Storage”.
-
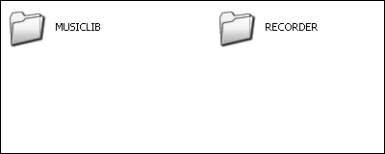
Double-click “PIANO”.
• “PIANO” contains folders named “MUSICLIB” and “RECORDER”.
• To transfer a user song to the digital piano from your computer, open the “MUSICLIB” folder and put the song into one of the numbered subfolders (61 through 70). Each subfolder corresponds to a Music Library number: Subfolder 61 to Music Library 61, and so on.
• The files in the “RECORDER” folder are songs that have been recorded with the digital piano’s recorder function. You can move fi les from the “RECORDER” folder to another location on your computer, and you can return recorded song fi les to the digital piano by placing them into the “RECORDER” folder.
* Before starting a store or load operation, first check the file name extension to ensure it matches the ones shown in this column.Data Type Folder Name File Name and Extension* User songs MUSICLIB .MID: SMF format data (format 0/1)
.CM2: CASIO original format dataRecorder memory data RECORDER BIDREC01.CSR: CASIO original format data
In the case of a song recorded with the digital piano’s recorder function, change its file name to one of the names and extensions shown in this column.IMPORTANT!
• The initial default configuration for Windows XP, Windows Vista, and Windows 7 is to hide file name extensions. Perform one of the following operations on your computer to show file name extensions.• To show file name extensions under Windows XP
1. Open the folder you want.
2. On the [Tools] menu, click [Folder Options].
3. Click the [View] tab. In the [Advanced settings] list, clear the check box next to [Hide extensions for known file types].
4. Click [OK].• To show file name extensions under Windows Vista or Windows 7
1. Open Folder Options by cl icking the [Start] button, clicking [Control Panel], clicking [Appearance and Personalization], and then clicking [Folder Options].
2. Click the [View] tab. Under [Advanced settings] clear the [Hide extensions for known file types] check box.
3. Click [OK].To load a song into user song memory (Music Library 61 to 70)
1. Open the MUSICLIB folder.
2. Copy the song file (.MID or .CM2) to the number-named subfolder (61 to 70) whose name matches the number of the Music Library location to which you want to load the song.
• If there are two files with the filename extensions .MID and .CM2 in the MUSICLIB folder, only the .MID data will be loaded into user song memory.To transfer Recorder memory data between the digital piano and your computer
To transfer the digital piano’s current Recorder memory data to your computer, copy the contents of the RECORDER folder to your computer.
To return Recorder data you previously saved to your computer back to Recorder me mory, copy it back to the RECORDER folder (and replace the current RECORDER folder contents). -
After the file copy ope ration is complete, return the USB device mode to MIDI.
• If you are using a Macintosh, perform the eject operation (drag them to the trash can).
• While holding down the FUNCTION button, press the applicable keyboard ke y. See “USB device mode” on page E-24 for more information.
• Returning the USB device mo de to MIDI will load the contents of MUSICLIB into user song memory and the contents of RECORDER into Recorder memory.IMPORTANT!
• A data conversion error is indicated when both of the SONG button lamps, and the GRAND PIANO (CONCERT , MODERN) and ELEC PIANO button lamps are all lit, and a ll other lamps are unlit.